**Important Update**
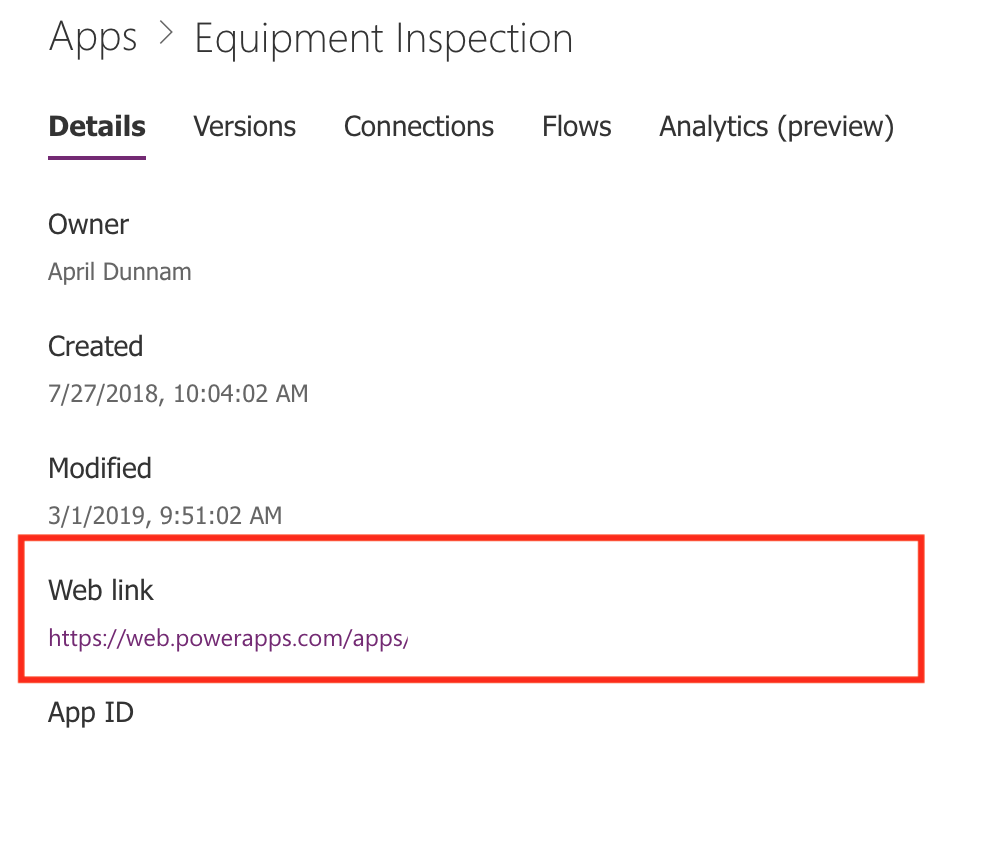
New functionality was added to PowerApps to allow guest access to apps via Azure AD. To accommodate for this, PowerApps now appends your Tenant ID to the URL of your app (see screenshot below for an example):

For this method to work you’ll need to change the way your URL is formatted. You’ll take the Web Link for you app that includes the Tenant ID and add an & after to pass in your custom parameter. Here’s an example: https://web.powerapps.com/app/12343ef?tenandId=133mytenant&ID=3
If you use SharePoint and are familiar with PowerApps then you probably know about the ability to select the “Customize Forms” option to customize your SharePoint List with PowerApps. This can be a good option to customize your forms but if you go to the documentation about it you’ll notice there are some limitations to the functionality:
If the Customize forms option isn’t available or doesn’t work correctly for your list, it might contain data types that PowerApps doesn’t support. Also, you can’t move your form to a different list or environment.
Because of these limitations, I generally prefer to create a separate Canvas app and connect it to my SharePoint data instead.
But if you go with this approach, how do allow users in SharePoint to open the PowerApp to edit the item instead of the default SharePoint list form?
Column Formatting to the Rescue!
We can use SharePoint Column Formatting to transform one of your fields to a hyperlink which opens the PowerApp with the ID of the item selected passed through via a parameter. To see more examples of column formatting, including screenshots of how to get to the settings, see my blog on “Show Map in Rich Text Field”.
The code needed to make a column in your list a hyperlink to open a PowerApp is below:
{
  "$schema": "https://developer.microsoft.com/json-schemas/sp/column-formatting.schema.json",

  "elmType": "a",

  "txtContent": "@currentField",

  "attributes": {
    "target": "_blank",
    "href": "='PutURLOfYourPowerAppHere?ID='+[$ID]"

  }
}
The only thing that you’ll need to change in the code above is to put in the URL of the PowerApp you want to open where it says “PutURLOfYourPowerAppHere”. You can get the URL of your app by clicking the “…” next to the app and selecting “Details”.
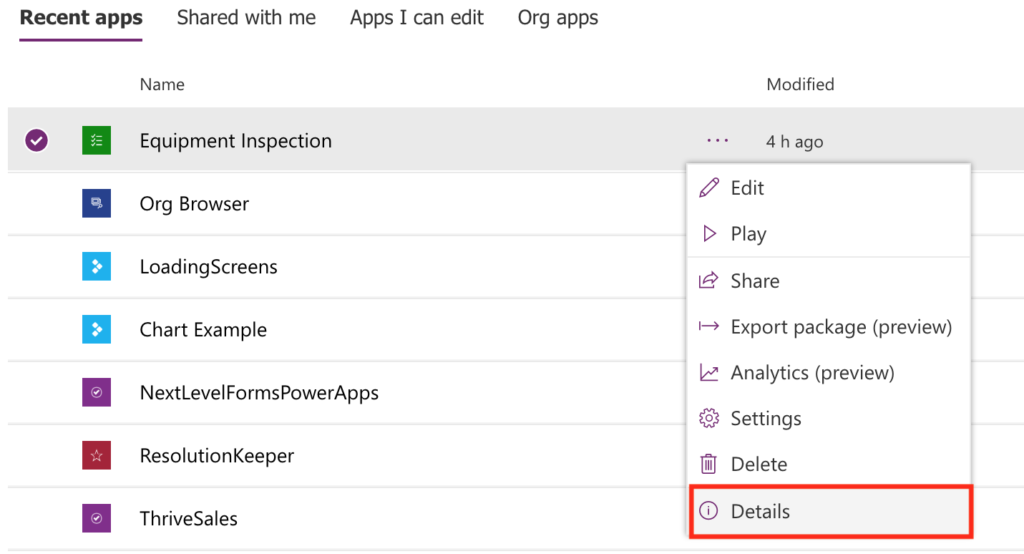
The Web link is the value you want to copy and paste into the code snippet.
PowerApps Set Up
Now that you know how to make SharePoint pass in the ID of the selected item and open a PowerApp, you need to do some work from the PowerApps side of the house to let our app accept that parameter and to automatically open the Details Screen of that item. The App that I have is a simple 3 Screen app with a Browse, Detail and Edit Screen.
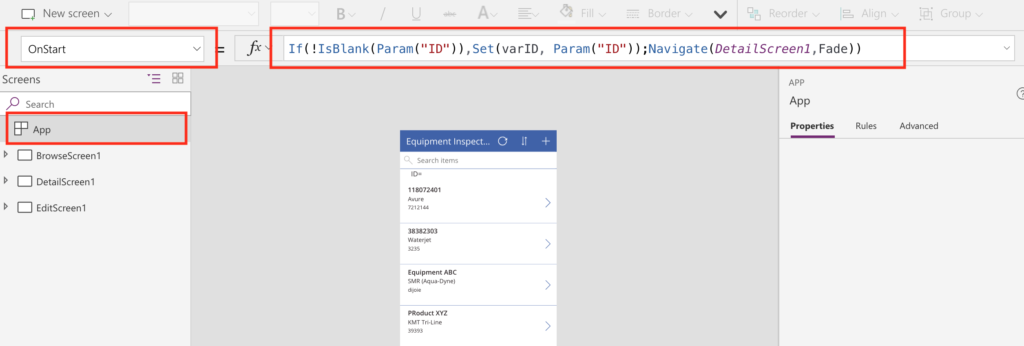
The first step is to go to the OnStart Property of your PowerApp by click App and selecting OnStart from the properties dropdown. You need to check for our ID Parameter that we are passing in with our column formatting. If that Parameter is there, you’ll need to write it to a variable then we want to navigate to the Detail Screen to see the details for that item. If it isn’t there then the app should just behave as normal allowing the user to select an item from the gallery. The formula you need to make this happen is below:
If(!IsBlank(Param("ID")),Set(varID, Param("ID"));Navigate(DetailScreen1,ScreenTransition.Fade))
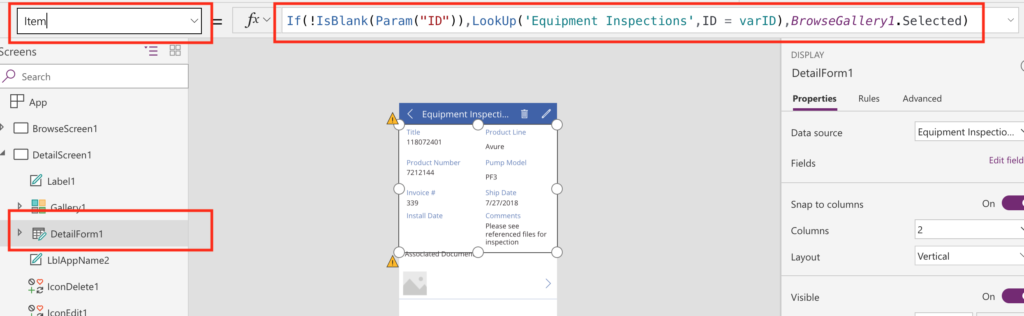
The last thing you need to do is go to the Details Screen to tell it which item to show. You need to go to your Form Control in the screen and select the Item property from the properties dropdown. You’ll want to check if that ID parameter is defined and if so lookup for that record in the SharePoint list. If it’s not defined then use the selected item from the gallery. That formula is below:
If(!IsBlank(Param("ID")),LookUp('Equipment Inspections',ID = varID),BrowseGallery1.Selected)
That’s all that you need to do to launch a PowerApp from SharePoint. I’ve also created a video that walks you through these steps:
Hi April! Thanks so much! I shared this with someone who was looking for help but what I did not understand is how this acts if you select “New”. Will it open in the Canvas app form? I’m guessing since you said it goes to the browse gallery, they can hit the Plus key to add a new record — thus putting them fully within the Canvas app.
BTW, great clarity and energy in your presentation!
Hi Cindy,
So in this case if you select “New” in the SharePoint list it will still open the default SharePoint list form. With modern SharePoint there is no way to modify that new button to change it’s behavior. One potential work-around is to create a custom page in SharePoint which you surface up your SharePoint list in and hide the tool bar. Then create your own custom “New” button on that page which is set to open the PowerApp. You would just direct your users to this page instead of the SharePoint list itself. Another option would be to create a SharePoint customized form on that list and have that form re-direct to your stand alone app. You can do this by putting in a Launch() command in the OnView property of your SharePoint customized form. Hope this helps!
Hello,
I followed your procedure well, the problem is that it is always the first item that opens regardless of the selection in the list.
The code is the same (except the name of the list) for dataform1.
Thank you for your help
Hi April,
Nice Solution, and I just try it in Web Browser, it work properly, but did you try it in PowerApps mobile version, e.g. IOS. On my iPhone, it cannot work properly, and it just display the browseScreen without any redirect action.
Any Idea?
This was a great article. I have a question regarding the 2nd formula, where you are setting the Item property by doing the lookup in the ‘Equipment Inspection’ list using the ID that was passed in. If the ID is blank, you navigate the user to the BrowerGallery1.Selected, so in effect they remain in the PowerApp whether the lookup to the Item is successful or not. Instead of navigating to a gallery within the PowerApp, is it possible to navigate back to the original view where they clicked the Link that launched the PowerApp?
If(!IsBlank(Param(“ID”)),LookUp(‘Equipment Inspections’,ID = varID),BrowseGallery1.Selected) – When I try to use this formula, it gives me errors on the ” = varID” part. I did change the lookup name to my SP site and the correct gallery plus it is already set on the App screen. Any ideas?
Hi April,
I just found this post and wonder if this will work on a library instead of a list and how can the OOTB functionality be mimicked when adding a new document.
Why I ask is because I’m truggling with a customer requirement to have several project sites to store project documents and have some form logic to add metadata to the documents. I think your solution could work in my scenario if the end user experience is not too far away from the default functionality.
In the old InfoPath world I could just save the library as a template and reuse it but that option is no yet available for powerapps as far as I know.
Thanks in advance for sharing
Hi April,
Somehow my previous message didn’t show up. So I try again. Do you know if a modern library with custom powerapps form can be saved as template and be applied to other libraries in different site collections?
Thanks in advance,
Thank you for this article!
You can even use Calculated field with App link and passing ID as query string.
hello,
thank you for your wonderful instructions, I followed them and I made a new empty canvas app which is split in two, the upper section returns the items based on the Variable how you explain and the lower section is a new form with other fields which I need to be completed. my issue is that I need when I press the button the lower section to update the fields at the same ID based on the variable. any ides?
thank you in advance
Thanks, April, this was just what I need for part of my solution. I can display the PowerApp form associated with the ID of the SP list item, but I need to also show a gallery I’m using as a repeating table that is associated with the same ID. The gallery writes its items to a separate list and uses the ID of the form item as a MasterID column in the gallery list. I can’t figure out how to display the form and its associated gallery items. The form displays but not the gallery.
Hi , good post. Ideally, I want to have an Approve button that calls my Power App( edit screen), similar to Laura’s button in “sharepoint list to trigger microsoft flow – e.g. an “AppAction ” to hook into, in the column formatting.
Hi April,
this is very useful just want I needed. I was having big headache trying to create this.. Thank you so much
I have one question, how to submit when click on the tick into workflow via email notification v3 as we are not link to O365 yet in PowerApps.
Please share more of your tutorial in future. I like to request if you can kindly tutorial to create Dashboard for admin and user for event, registration and check in which can update into SP list. thank you
Hi April! Is it possible to open power app on the same page as modal scrollable content (similar to how it opens by default without any customizations)?
Hi April – I am waiting to use this function but I am wanting the app to open within the same window as the sharepoint list – not a new tab. What would I need to do to make that work?